Tuesday, May 18, 2010

Artichokes! Glorious, Glorious Artichokes!

Artichokes are relatively new to me. Several years ago, I had my first spinach and artichoke dip. Eventually, I found a few recipes that included marinated artichoke hearts. But it wasn't so long ago that I had my very first whole, steamed artichoke that a friend made for me, and I fell in love.

Artichokes are in season from spring through fall. They're one of the messy foods, like crab legs, that you have to pick through but are worth all the work. After you steam them, you eat the meaty parts of the leaves, and pick off the spikey middle to reveal the artichoke heart, like the prize in a cereal box. Artichokes are candy to me, sweet and flavorful. Here's how I make them...

FOR THE PERFECT STEAMED ARTICHOKE:

Take the uncooked artichokes and cut the top 1-2 inches off. Cut the pointy tips of each leaf off. Pull off any very small leaves off the base. Cut the stem off close to the bottom of the artichoke.


In a large pot, place 2 inches or so of water. Squeeze a quarter of a lemon or so into the water, and drop the lemon in. Add 2-3 crushed cloves of garlic, and bring to a boil. Put a veggie steamer into the pot, and place the artichokes in it, cover, and steam on medium-low for 40-45 minutes.

Near the end of the steaming time, melt some margarine or butter in a small sauce pan for dipping the leaves into. Add lemon juice if desired. Put the butter into a small bowl.

Artichoke after steaming:


To eat, pull each leaf off and dip into the butter sauce. Using your teeth, scrape the meaty part off of the bottom of each leaf, and throw away the rest of the leaf.


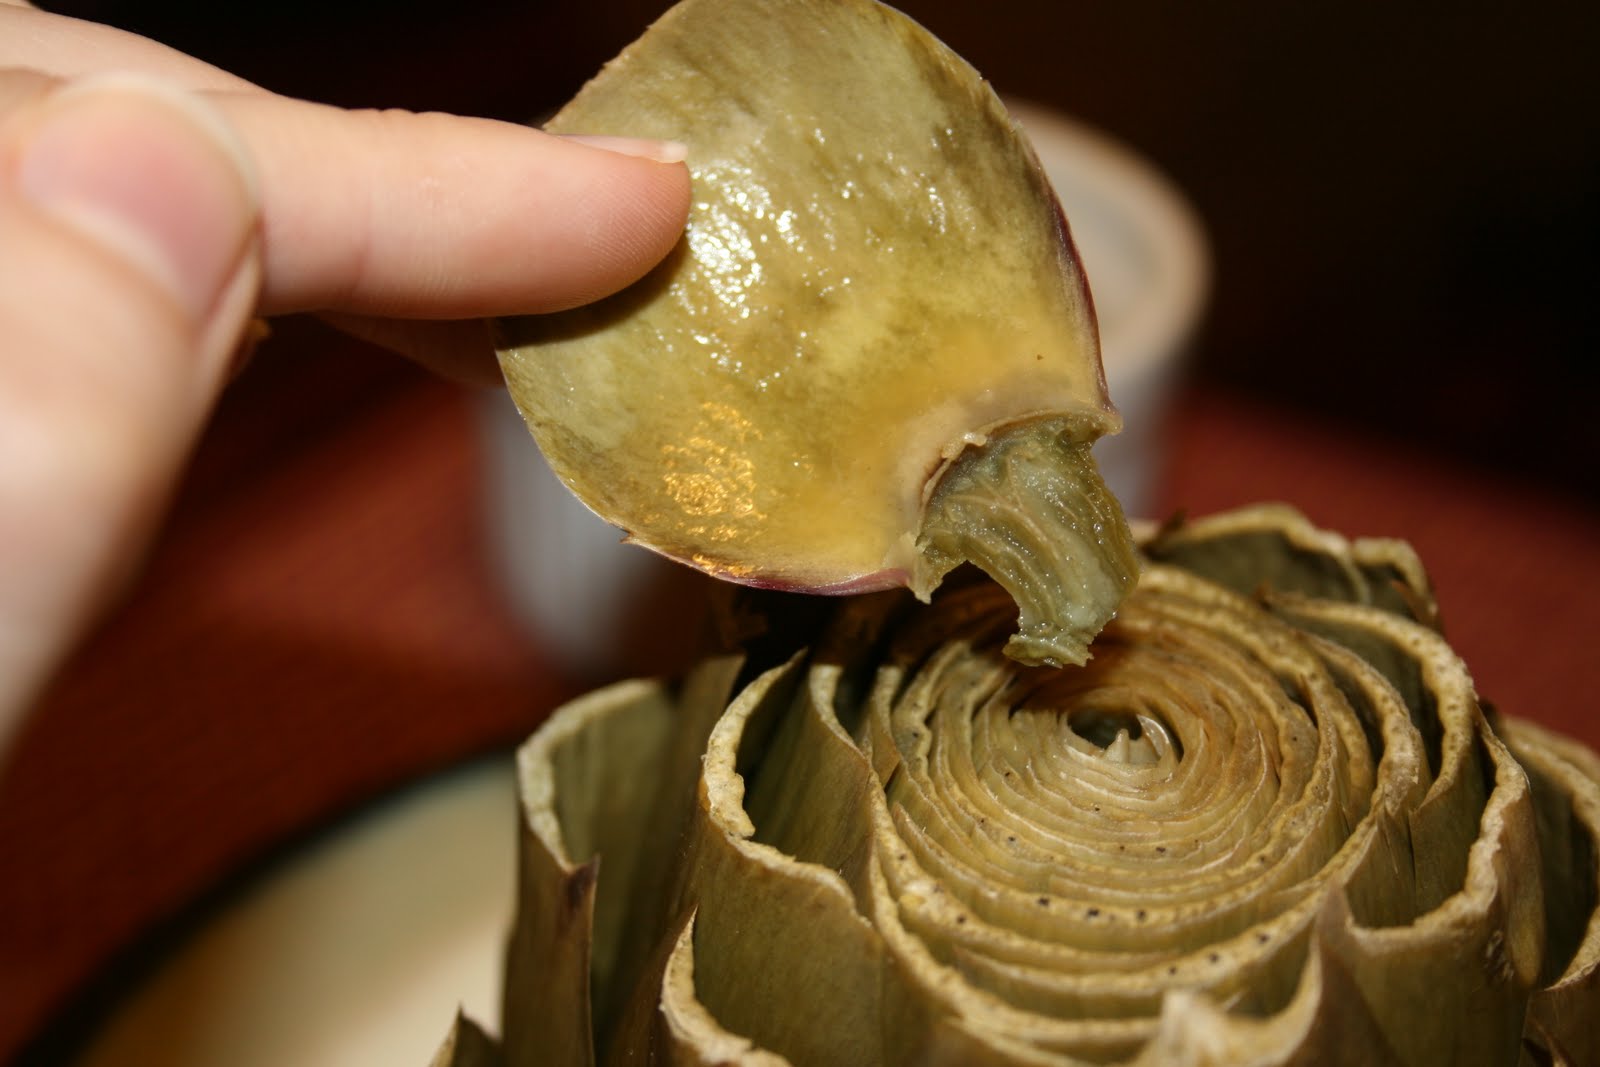
Eventually, you'll get down to leaves that have a purple tip, and those have thorns on the ends. Be careful. I still will eat the bottoms of most of those, but as you get more into the middle, it's easier just to pull them all off.


Once all of the purple leaves are removed, there is a layer that looks "fuzzy." You can pull off that entire layer (and discard) to expose the artichoke heart!

The heart is the prize you worked for! You can eat the rest.


Ahhhh glorious...

Recipe #34: Thai-Style Shrimp and Veggies with Toasted Coconut Rice

This is a Rachael Ray recipe from a new cookbook I received for my birthday! I wasn't quite sure what to expect, but I decided to try it since I'm a big fan of coconut. The result was so different than anything I've made so far- the ginger and lime in combination with the coconut makes a light but flavorful combination. We enjoyed this, despite the fact that once again, I burned the rice to the bottom of the pan. Luckily there was enough for both of us...


INGREDIENTS:

2 1/2cups chicken stock or broth
1 1/2 cups sweetened shredded coconut
1 cup long-grain rice
4 tablespoons vegetable oil
1 1/2 pounds large shrimp, peeled and deveined
Salt and freshly ground black pepper
1 small yellow onion, sliced
8 napa cabbage leaves, thinly shredded
1 cup store-bought shredded carrots, or 1 medium carrot cut into matchsticks
1 teaspoon red pepper flakes
3 large garlic cloves, chopped
3-inch piece of fresh ginger, peeled and grated
1 red bell pepper, cored, seeded, thinly sliced
3 tablespoons tamari (dark aged soy sauce)
5 scallions, thinly sliced
20 fresh basil leaves, chopped or torn (I only had about 10)
1/4 cup fresh cilantro leaves, chopped (I skipped this- I'm not a big fan of cilantro)
Juice of 1 lime

DIRECTIONS:

In a sauce pot, combine 1 1/2 cups of the chicken stock with 1 cup of the sweetened shredded coconut; bring the mixture up to a simmer, and add the rice. Return to a simmer over low heat and place a tight-fitting lid on the pot. Cook the rice for 18 minutes. (Mine burned, as usual...)

Heat a small skillet over medium heat, add the remaining 1/2 cup of shredded coconut, stir frequently, and toast until golden, about 2-3 minutes. Heads up: Once the coconut starts to brown it will go from golden to burnt quickly, so keep an eye on it. Remove the toasted coconut from the pan and reserve.

Heat a large skillet over medium-high heat with 2 tablespoons of vegetable oil. Season the shrimp with salt and pepper and add to the hot skillet. Saute the shrimp for 2 minutes on each side, until they turn pink but are not yet firm, then remove from the pan and reserve. Return the skillet to the heat and add the remaining 2 tablespoons of vegetable oil. Add the onion,s cabbage, carrots, red pepper flakes, garlic, ginger, and bell peppers to the pan. Cook, stirring frequently, for 3-4 minutes. Add the tamari and the remaining cup of stock, then toss the shrimp back into the pan and stir to combine. Cook the shrimp and veggies for 2 more minutes, until the shrimp are cooked through. Add the scallions, basil, half the cilantro, and lime juice and taste for seasoning.

Add the reserved toasted coconut to the cooked rice. (I just topped everything with it instead). Fluff the rice with the fork to distribute the toasted coconut. Serve the Thai shrimp on top of the toasted coconut rice, sprinkled with the remaining cilantro.

Saturday, May 15, 2010

Recipe #33: Southwest Chicken Burgers

Fantastic, quick, flavorful, and pretty healthy recipe. Made it in a hurry for dinner tonight, and I was quite happy with the results despite being skeptical about how ground chicken would taste. I bring you Southwest Chicken Burgers!


INGREDIENTS:

1lb ground chicken
1/3c salsa (I used a black bean and corn salsa, medium heat)
1 tablespoon ground black pepper

DIRECTIONS:

In a bowl, combine the salsa, pepper, and chicken. Form into patties (I made 3, you can also make 2 or 4 depending on how hungry you are...)

Heat a pan and spray with olive oil spray. Place the patties in the hot pan and cook for 4-6 minutes each side, until cooked through.

Serve on buns with your choice of toppings. We melted swiss cheese on them, grilled up some onions, and added fresh spinach and tomato slices. I will be making these again for sure!

Recipe #32: Honey and Black Pepper Beef- WOK RECIPE!

I christened my wok, and it was a success! I was quite thrilled to try my hand at using a wok for the first time after so much anticipation. Even Nick tossed the ingredients around a little bit. From my stir-fry cook book comes a great and simple recipe for honey and black pepper beef.

INGREDIENTS:

oil, for cooking (preferably canola)
1lb round steak, cut into thin strips
2-3 cloves garlic, crushed
1 onion, sliced
10oz sugar snap peas
2 tablespoons honey
2 teaspoons soy sauce
2 tablespoons oyster sauce
3 teaspoons cracked black pepper

DIRECTIONS:

1. Heat the wok until very hot, add 1 tablespoon of the oil and swirl it around to coat the side. Stir-fry the beef in batches over high heat. Remove and drain on paper towels. (I put paper towels in between each batch to help with draining more.)


2. Reheat the wok, add 1 tablespoon of the oil and stir-fry the garlic, onion, and sugar snap peas until softened. Remove from wok and set aside.


3. Add the honey, soy sauce, oyster sauce, and cracked pepper to the wok. Bring to a boil, then reduce the heat and simmer for 3-4 minutes, or until the sauce thickens slightly.

4. Increase the heat, return the meat and vegetables to the wok, and toss for 2-3 minutes, or until well combined and heated through.


I served this over basmati rice.

Wednesday, May 12, 2010

Wok

I bought a wok today, FINALLY! I'd been saying I wanted one for months and months... I love stir-fries and wanted to be able to make them "properly" in this awesome kitchen tool.

So, with a gift card and a coupon, I went to Bed Bath and Beyond and purchased this bad boy:


Don't be fooled, though- it doesn't come with vegetables. :)
(http://www.bedbathandbeyond.com/product.asp?order_num=-1&SKU=16557250)

I had already bought a stir-fry cook book a few weeks back, knowing that sooner than later I'd purchase a wok. I started reading it today in anticipation of using my new kitchen minion, and I have to say, it's a great book. I'd like to recommend it to you:


It offers information on seasoning your wok, how to use it, information on all different types of seasonings, veggies, and anything else you might want to cook in it, and of course recipes.

Side note: Half Price Books is a great place to look for cookbooks- they're so cheap!

Tomorrow I am going to clean and season my wok for the first time. I've picked a recipe for its christening, so stay tuned! Hopefully I'll get the hang of using this thing quickly...

Also, I'm annoyed about peanut oil- I went to the grocery store with the intention of buying peanut oil, but they only sold it in this huge jug. I don't have room for that... I'll have to look elsewhere or just use canola. These oils are better for the really high heat cooking that the wok is used for, which means less smoke...

And back to reading my book...

Friday, May 7, 2010

Recipe #31: Curry-Kissed Chicken

After working out, Nick and I wanted something light and easy to make for dinner. This recipe is adapted from one of my many cookbooks, and it came together in 10 minutes. Definitely a keeper for those nights I need to make something quick.

Simply season chicken breasts, chicken tenders, or thin sliced chicken breasts with black pepper and curry powder. Heat a few tablespoons of olive oil in a pan, and place the chicken in the hot oil, cooking each side for as long as necessary until cooked through. I used thinly sliced chicken breasts, so it was only a couple minutes per side.

For the sauce, heat some globs (half a small jar or so, maybe less) of apricot preserves and a little water in a small sauce pan until the preserves melt. Add a heaping tablespoon of sour cream, or a small amount of heavy cream, to the preserves and melt and mix thoroughly.

Serve the chicken over rice. I used jasmine rice from one of the Uncle Ben's 90 Second Rice packs. (90 seconds in the microwave is great, and no burnt rice!) Top the chicken with the apricot sauce, and sprinkle some sliced green onion on top.

The result is a flavorful quick meal that's sweet with a little bit of heat.

Tuesday, May 4, 2010

Recipe #30: Easy Baked Halibut

This recipe is an adaptation of one that I found on allrecipes.com. It's healthy and very light. You can make the topping according to your tastes, adding seasonings and veggies, but this is how I put mine together:


INGREDIENTS:

halibut steaks, cut into 6oz chunks
onion, minced, to taste
garlic, minced, to taste
tomato, diced, to taste
salt and pepper
fresh or dried basil
olive oil

DIRECTIONS:

Preheat oven to 450 degrees.

First, lightly grease a shallow pan, and put the halibut steaks in the pan. Make sure the pieces are about 6oz each- cut the halibut steak into chunks if need be. Salt and pepper the pieces.

Saute the onion and garlic in olive oil until the onion starts to soften. Add the basil and cook a minute or two longer. Remove from heat, and mix in diced tomatoes. Place some of the topping on each of the halibut pieces.

Place in the oven and cook for 15-20 minutes, until the fish flakes easily with a fork.


I imagine that this topping would taste good on any similar, white flaky fish, like tilapia. I made steamed broccoli (with margarine, no salt) for the side.